There is something almost magical about walking out your door and snipping fresh herbs for dinner. The burst of scent as you crush a basil leaf between your fingers. The satisfaction of transforming a simple meal with something you grew yourself. This is the promise of the living larder—a garden that feeds not just your body but your spirit.
Why Start with Herbs
Herbs are the perfect entry point for new gardeners. They are:
- Forgiving: Most herbs tolerate imperfect conditions and beginner mistakes
- Productive: Even a small bed can provide abundant harvests
- Valuable: Fresh herbs from the grocery store are expensive; homegrown are essentially free
- Sensory: Fragrance, texture, color—herbs engage all the senses
- Compact: Many thrive in containers or small raised beds
Planning Your Bed
Location, Location, Location
Most herbs crave sunlight. Choose a spot that receives at least 6 hours of direct sun daily. Ideally, this location is close to your kitchen—you’re more likely to use herbs you can easily access.
Size and Construction
For beginners, I recommend a raised bed approximately 4 feet by 4 feet. This size is:
- Manageable for one person to maintain
- Large enough to grow a good variety
- Easy to reach all plants without stepping on the soil
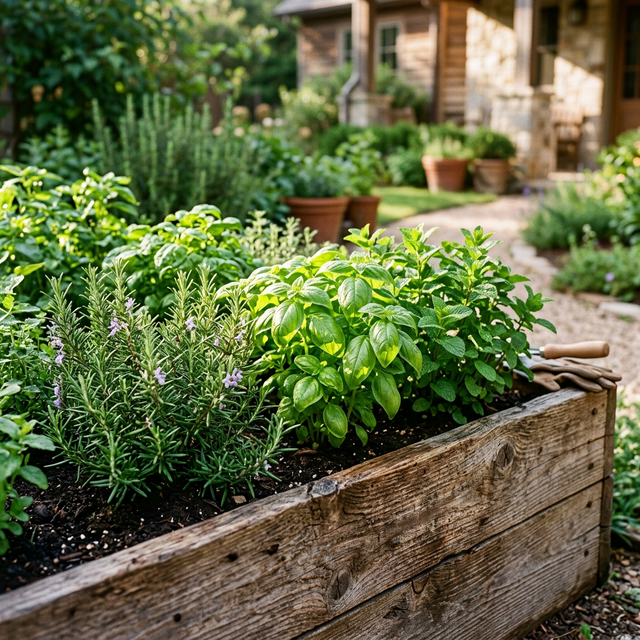
Materials can be simple: untreated cedar or redwood boards, stone, brick, or even galvanized metal troughs. The key is ensuring good drainage and using non-toxic materials.
Soil
Invest in quality soil—this is not the place to cut corners. A mix of:
- 60% quality topsoil
- 30% compost
- 10% perlite or coarse sand for drainage
Fill your bed to within an inch of the top, then water thoroughly to settle the soil.
Choosing Your Plants
For your first season, focus on herbs you actually use in cooking. Here are my top recommendations:
Essential Five
- Basil: The queen of summer herbs. Plant after all danger of frost has passed.
- Rosemary: Evergreen and drought-tolerant. Perfect for Mediterranean dishes.
- Thyme: Low-growing and hardy. Wonderful with roasted vegetables and meats.
- Parsley: A biennial that provides harvests for two years. The workhorse herb.
- Mint: Plant in a container within your bed—it’s invasive but indispensable.
Worth Adding
- Chives: Perennial and self-seeding. Lovely purple flowers are edible too.
- Sage: Hardy perennial with beautiful silvery leaves.
- Oregano: Another Mediterranean staple that thrives on neglect.
- Cilantro: Fast-growing but quick to bolt. Succession plant every few weeks.
Planting and Care
Spacing
Give herbs room to grow. As a general rule:
- Large herbs (rosemary, sage): 2 feet apart
- Medium herbs (basil, parsley): 1 foot apart
- Small herbs (thyme, chives): 6 inches apart
Watering
Herbs prefer consistent moisture but despise soggy roots. Water deeply when the top inch of soil feels dry. Morning watering is ideal, allowing foliage to dry before evening.
Feeding
Herbs grown in quality soil with added compost rarely need additional fertilizer. If growth seems sluggish, a light application of organic fish emulsion in midsummer can help.
Harvesting
The more you harvest, the more herbs produce. Regular snipping encourages bushy growth. Always cut just above a leaf node—the point where leaves emerge from the stem.
Best harvesting times:
- Morning: After dew has dried but before the heat of the day
- Before flowering: Flavor is most concentrated before plants bolt
Troubleshooting Common Problems
Yellow leaves: Usually overwatering or poor drainage Leggy growth: Insufficient light Bitter taste: Plants are stressed—often from heat or drought Pests: Aphids and spider mites can be controlled with strong water sprays or insecticidal soap
Extending the Season
Many herbs can be harvested well into fall. Strategies for prolonging your growing season:
- Succession planting: Sow fast-growing herbs like cilantro and basil every few weeks
- Cold frames: Simple structures that protect tender herbs from early frosts
- Drying: Harvest herbs at their peak for winter use
- Indoor growing: Pots of rosemary, thyme, and parsley can winter on a sunny windowsill
The Daily Ritual
The true gift of a herb garden is not the harvest—it’s the ritual. Morning visits to check growth. Evening snipping for dinner. The way your hands smell of rosemary long after you’ve returned indoors.
These small interactions with living things ground us. They remind us of natural cycles, of patience, of the simple pleasure of growing.
Building your first raised bed is an act of hope. You are planting not just seeds but intention—intention to cook more mindfully, to eat more seasonally, to connect with the natural world just outside your door.
Start small. Start now. The herbs—and your future self—will thank you.